
Please attend the webinar (or watch the post-production video) for demonstration and additional details. Please contact support for additional information and let us know if you have any feedback.
New Features
-
New Post Schedule option on Post Layouts
-
A new check box called ‘Include Post Schedule’ is available for the Post Schedule in the Output Settings
-
If checked, then a post schedule will be included on the post layout
-
Posts will be grouped and labeled based on the post material and foundation materials. If post and foundation materials match, then posts will have the same label
-
Each individual post will have a label on the layout
-
The post label, post material, and foundation materials will be listed in the schedule on the bottom right-hand corner of the post layout
-
-
New doors and windows input
-
Doors and windows can now be grouped and filtered by ‘Style’, and each style has a new icon. For example, Window Styles include: Slider, Double hung, Casement, Fixed, Bale Door or Combo Mullionioned with recognizable icons
-
Overheads, Sliders, and Walk doors have their own Styles.
-
Styles need to be set for each opening in the Setup Wizard, either manually or using the upload/download Excel files
-
To input a window in a job, you click on the icon of a Style to display and select a specific opening in that style
-
‘All’ is an option that will include all openings for a selected opening type (Windows, Walk Doors, etc.) regardless of the Style and will be available if no Styles are set.
-
Custom openings are also an option, as before
-
-
New Cupolas input
-
Similar to the new door and window styles, cupolas can now have a Style of ‘Louvered’ or ‘Window’ in the Setup Wizard
-
To input a cupola you can select a Style icon and then a specific cupola
-
The graphics in the 3-d model will display based on the Style (Louvered or Window)
-
-
Steel Truss
-
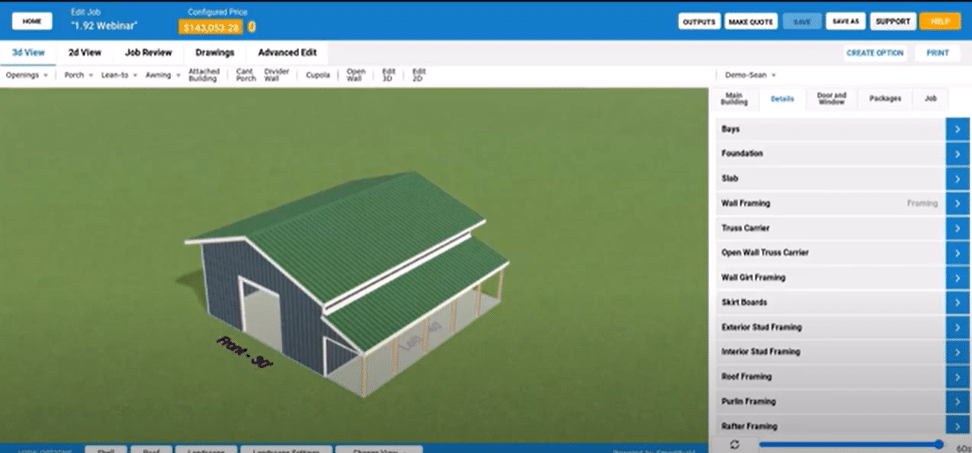
There is a new ‘Material’ option that can be applied to trusses which includes ‘Wood’ or ‘Steel’
-
In a job under Roof Framing, you can set the Truss Material to Wood or Steel
-
Steel trusses will be displayed with a gray color, and pick a Steel truss from the truss catalog (if it exists)
-
-
Parallel Chord Truss
-
There is a new ‘Parallel Chord Truss’ option under ‘Truss Special’
-
This can be set in the Truss catalog and applied in a job
-
Parallel chord trusses will be shown in the 3-d model according to a new setting ‘PCT Depth’ input which will reflect depth of the parallel chord truss in the 3-d model
-
There is also a Left Base and RIght Base length that can be defined for parallel chord trusses
-
If you use Steel truss with Parallel Chord Truss and match a truss in your catalog then a black PCT truss with a general web pattern will be shown in the 3-d model
-
-
Inset Gable
-
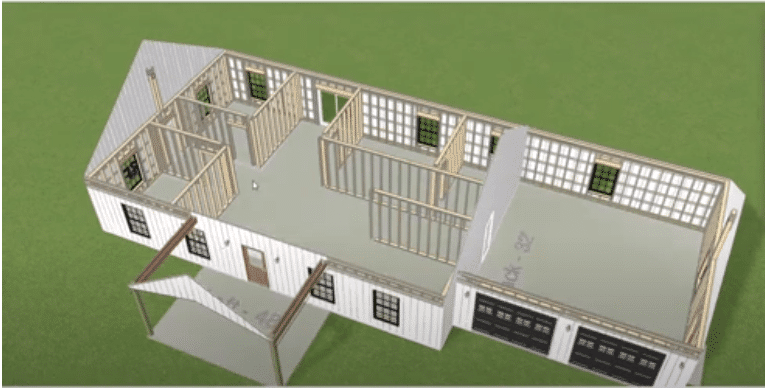
Under the Wall Framing settings there is a new option under Gable Wall Style called ‘Inset Gable’
-
If set, then the gable trusses will be inset/notched flush with the outside of the post and the girts will continue up to the top of the gable wall
-
-
Purlin overrides
-
There is now a way to override the program selected purlin layout lengths
-
*This is only available under the Advanced Edits*
-
Under Advanced Edits, each roof panel now has an input for ‘Purlin Layout Override’, there is also a ‘Purlin Layout Override (Stagger Row)’ if using staggered purlins
-
In this field, you can define the lengths of the purlins to layout on the roof, always from the left side of the roof panel
-
So, if the program uses 2-20’ purlins for a 40 foot roof with 10’ spacing, you could override this in Advanced Edits using ‘Purlin Layout Override’ and enter 10,20,10. The program would put 1- 10’ long purlin starting on the left side for the first bay, then 1- 20’ length over the middle 2 bays and then another 10’ board to finish the row on the right side of the building.
-
At this time, this does not apply to the roof as a whole (must do it for each panel) nor to individual purlin rows independently (all rows will get the same override per panel)
-
*Be careful with this as it will obey what you put in here even if it doesn’t make sense with your spacing and it will ignore your preferred lengths
-
-
New Admin Permission Settings to hide specific input options per user
-
If you have Administrative controls, you can go to Settings/Users to control these permissions
-
There are 5 groups of settings that can be checked on or off for each user account: 1. Doors and Windows, 2. Attached Buildings, 3. Special Walls, 4. Cupolas and 5. Open Walls
-
If unchecked then that user will not be able to see/use/edit those inputs when editing a job
-
For example, if ‘Special Walls’ is unchecked then that user will not see the buttons for Cant Porch or Divider Walls in a job and therefore cannot add or edit those types of inputs.
-
The user will need to log out/in before these settings will take effect
-
By default, these will all be checked on for each user (current behavior)
-
-
BUG FIX-Don’t Show any pricing information on the Job Bid when Show Cost and Price checkboxes are off
-
BUG FIX-Calc Base button { } in the Job Review mode does not open the list